

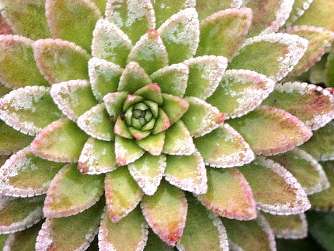
Sony CD1000 at 20X Zoom
Sony CD1000 at 20X Zoom


Sony FD91 at 14X Optical
Sony FD91 at 14X Optical
Introduction. This article discusses ways in which a digital camera may be used for recording macros or extreme close-up images without requiring the purchase of costly accessories. A Sony Mavica CD1000 and a Sony Mavica FD91 digital cameras were used to obtain the included images, but most article contents will also apply to many other digicams, especially those with long zooms.
Definitions. The Kodak online dictionary contains the following definitions (Kodak):
Macro Lens - A lens that provides continuous focusing from infinity to extreme close-ups, often to a reproduction ratio of 1:2 (half life-size) or 1:1 (life-size).
Close-Up - A picture taken with the subject close to the camera, usually less than two or three feet away, but it can be as close as a few inches.
Close-Up Lens - A lens attachment placed in front of a camera lens to permit taking pictures at a closer distance than the camera lens alone will allow.
One source defines macro photography (macrophotography) simply as large pictures of small objects (Bruce:222). Another source says that close-up or macro photography is any photo that is within a few inches of a subject and attempts to magnify it, showing the subject from a closer perspective than humans ordinarily see (Johnson:214). Some sources place emphasis on differences between macro photography and close-up photography based on the reproduction size of the subject on the film as related to the actual size of the subject; however, since digicams do not use film (digicam files are a collection of 1s and 0s), any definition which attempts to differentiate between the two types of images becomes questionable. Further, there seems to be little practical value in calling one photo a macro and the other a close-up when either type can be printed at a variety of sizes such that it is not possible to easily discern which is which. Most books and article concerning digital photography now use the terms interchangeably, and that seems reasonable.
Methods. There are a variety methods and equipment that may be used to accomplish macro or close-up photography, but this article concentrates on those that are relatively inexpensive.
1. Zoom only. The large zoom of the Sony CD1000 and some other digicams can be used for close-up photos when the subject cannot be closely approached for one reason or another. It may be a feature on a building, a piece of art behind a railing, an insect or animal that cannot be closely approach without causing it to depart, or some other subject where use of the macro capability of the camera is not practical. If the subject is of sufficient size, use of the zoom may be all that is needed to adequately fill the image frame. At full 10X optical zoom, or 20X with digital 2X magnification, the CD1000 will not focus closer than about 31 inches from the subject (the doubling by digital enlargement has no effect on the minimum focus distance). At that distance a quarter or Susan B. Anthony (SBA) $1 will just about fill the height of the viewfinder or LCD. When a ruler is viewed at the same distance and magnification, a little over 1.5 inches of the ruler scale will be visible.
Sony CD1000 at 20X Zoom
Sony CD1000 at 20X Zoom
Sony FD91 at 14X Optical
Sony FD91 at 14X Optical
2. Macro mode. Some digicams such as the Sony FD71, FD91, and others do not have a separate macro mode, but do have the capability to focus on subjects very near the camera lens. In the case of the FD91, a subject such as a dollar bill can be placed directly on the front of the camera and the auto focus system will provide a perfectly sharp image. Even digicams such as the Sony FD71 with only 640 x 480 pixels can make excellent close-ups merely by ensuring that the subject is adequately lit. Several superb examples can be seen on John Walkenbachs web site under the heading of Closeup (http://www.j-walk.com/digitalimages/).


Sony CD1000 Macro.
Sony CD1000 Macro


Sony FD91 Close-up
Sony FD91 - $5 Against Lens
(Click
on Images for Full-Size View)
In some digicam models, a macro mode is used when the subject is closer than about 10 inches from the subject. A button showing an image of a tulip is the macro selector in such cameras. In standard mode (non-macro) the CD1000 will focus to within about 10 inches when at full wide angle. At that distance, a quarter or SBA $1 will fill approximately 10% of the viewfinder height. Closer distances require switching to macro mode. In macro mode the CD1000 will focus on subjects that are as close as 13/16 inch from the lens. At that distance, a subject the size of a quarter or SBA $1 will fill approximately 75% of the LCD or viewfinder height. Unfortunately, this may be a little too close for adequate, properly angled lighting and it may thus be difficult to obtain good images. The macro mode does have an advantage over the 20X zoom in that it is entirely optical and does produce a sharper image if it is possible to obtain adequate light and if the subject does not object to the close presence of photographer and camera. If a subject is semi-transparent such that adequate light is present through it, the CD1000 will focus as close as about ¼ inch from the focusing ring.
An Internet site well worth viewing is that of Marcel Baer (Baer). Marcel used an Olympus E-10 in macro mode to take photos in the alpine garden of the Pensionat Menzingen, Switzerland. Tripod and flash were not used. (http://mypage.bluewin.ch/edlibaer/anblick/alpinegarden/)

Alpine
Garden, Olympus E-10, Marcel Baer (Used with Permission)
3. Zoom with close-up lenses attached. As noted above, when at 20X the CD1000 will not focus when nearer than about 31 inches from the subject. Close-up lenses allow the camera to be moved nearer to the subject and still remain in focus. These add-on lenses are usually described in terms of magnifying power, but magnification is not as useful a concept as is referring to their ability to reduce the minimum focusing distance between the camera and the subject. This in turn results in significant magnification of the image as the camera is moved nearer to the subject.
Close-up lenses which can be attached to the front of the camera are designated in various powers called diopters. The higher the diopter number, the higher the magnifying power. Further, they can be added together to produce even higher powers. Commonly sold sets of these lenses usually include a 4-diopter lens, a 2-diopter lens and a 1-diopter lens. Total possible power is thus 7 diopters. When used in multiples, the highest diopter lens should be placed closest to the camera, second highest next closest, etc.
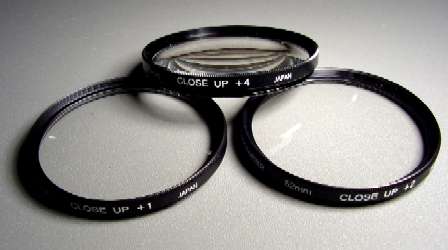
Set
of Three Close-up Lenses: 1 Diopter, 2 Diopter, and 4 Diopter
The effect of a 1-diopter lens on the minimum focus distance of the CD1000 at 20X is to reduce it from about 31 inches to about 17 inches. This may be a good compromise when you want to get closer to the subject, but not too close because you may cause the subject to react to your presence. Also, the less glass you use on the camera the less the quality of the image will be affected. The use of close-up lenses singly or in combination on the CD1000 reduces minimum-focusing distances to approximately the following:
1
Diopter 17 inches
2
Diopters 12 inches
3
Diopters 9 inches
4
Diopters 8 inches
5
Diopters 7 inches
6
Diopters 5.5 inches
7
Diopters 5 inches
These figures are only approximate and depend to some degree on what you think is in or out of focus. Without the close-up lenses, and at 20X, about 1.5 inches of a ruler is visible. With 7 diopters of close-up lenses added, about ¼ inch of the ruler is visible (see image below), an approximate increase in magnification of 6X over that of the zoom lens alone, and about 8X over that of macro mode. One significant advantage of using close-up lenses over use of macro mode, or several of the below discussed methods, is that even at the full 7 diopters there is more than enough space between the lens and the subject to allow for adequate lighting. One disadvantage is that the image may be slightly degraded by the addition of three extra pieces of glass. Also, as with all macro images, depth of field becomes very shallow and precise focus becomes critical. As with the macro mode, the subject would have to be one that would allow close proximity of the camera and photographer. Although the above figures are approximate and not based on precise laboratory measurements, they do illustrate the value of close-up lenses when combined with a strong zoom lens.


CD1000
at 20X Zoom & 7 Diopters
CD1000 at 20X Zoom & 7 Diopters

CD1000
at 20X Zoom & 7 Diopters
CD1000 at 20X Zoom & 7 Diopters
4. Use of a Magnifying Loupe. A loupe may be also used at the front of a camera to provide magnifying power for close-up photos. A loupe is similar to a magnifying glass except that it usually contains two or more individual lens elements and provides higher magnification than a single glass. Splendid examples by Wim Pollet can be seen on Belgium Digital. The loupe page is located under the 'Tricks & Tips' in the left menu on the Belgium Digital homepage www.belgiumdigital.com. Then click on 'Macrophotography with loupe' under the heading 'Camera Techniques.' Many samples of Wims macro photography can be see by clicking on BD Crew albums in the left column and then on the Canon S10 camera. There are several series of macro photos by Wim taken with the S10 as well as fireworks photos, air show photos, etc.
Wim used a Peak 10X scale loupe #1983 (about $60) placed in front his Canon S10 digicam. This loupe has four coated achromatic lenses in 2 groups. The canon S10 has a 2X lens just small enough to fit inside the eyepiece of the Peak loupe. The 2X lens limits maximum magnification to 20X. This magnification does not stretch the capability of a high quality loupe.
For experimental purposes, I purchased a $10 Carson loupe with a single 10X plastic lens. Loupes of various qualities and magnifying powers can cost $250 or more. The difference between those and a $10 loupe is that the more expensive loupes have a number of high quality coated glass elements which provide a sharp image across the width of view as opposed to the $10 loupe which provides a relatively clear image only in its center, and not a good image at that. The Peak loupe used by Wim Pollet has four coated elements and a focusing ring. The plastic 10x loupe did not work well with the CD1000. The main problem (other than low quality) was that the CD1000 lens is much larger than the Canon S10 and similar digicams, thus when placed against the CD1000 lens the loupe appears as a ring occupying about half of the image. This means that considerable zooming-in is required to eliminate the ring, but by then the quality of the image is totally unacceptable. Its possible that a very high quality 10X loupe might provide acceptable results, but the cost would be prohibitive. However, for those with digicams that have a small lens assembly similar to the Canon S10 it might be worth $10 to check out the possibilities. If you or a friend already have a loupe that you can experiment with, so much the better, but in most cases you may find that standard close-up lenses provides superior results to that of a cheap loupe.

Carson
10X Plastic Loupe and Maxwell 4X Multiple Element Loupe
I also tried taping a Maxwell 4X loupe to the front of the CD1000. This resulted in an image showing only 3/32 inch of a rulers scale. This particular loupe had a removable barrel which held the loupe about 1.4 inches from the front of the camera. With the barrel removed the magnification was somewhat less, showing about ¼ inch of the rulers scale. As with other types of magnifying lenses, increasing the distance from the camera increased the magnification. By using a loupe with lower power and better quality, it was possible to obtain better photos because the image could be enlarged enough to eliminate the loupe itself from view, but without exceeding the imaging capacity of the combined lenses. If a means of attaching the loupe to the camera were to be devised, such as by gluing a properly sized step-up ring to the loupe barrel, it could be effectively used as a macro lens. For temporary use I resorted to the old standby, duck tape. At about 5X zoom on the CD1000, the 4X Maxwell provided an excellent image of the main portion of the SBA $1 (see below). At 20X zoom it does reasonably well, but only in the center of the image. At 5X zoom the combined power is about 20X, similar to the Peak Loupe and Canon S10 with 2X zoom used by Wim Pollet, thus should be capable of macro images similar to those of Wim. If you happen to have access to a good loupe it could be well worth it to check out the possibilities.


CD1000
at 5X with 4X Loupe
CD1000 at 20X with 4X Loupe
5. 35mm lens attached. If you are like most digicam owners, you have a 35mm camera tucked away somewhere that is now gathering dust. If it is a SLR with a removable lens you have the makings of a super close-up system. The best/most extreme close-ups can be done by use of a standard 35mm SLR lens attached to the front of the digicams lens, not facing frontward, but facing backward. Magnification equaling or exceeding that of three close-up lenses combined can be done with a 35mm SLR lens attached directly to the front of a digicam. That is, by constructing an attachment ring so that the front of the 35mm lens can be coupled to the front of the digicam lens with the fronts of both lenses facing each other.
An attachment or coupling ring can be made by gluing together two step-up rings of the appropriate size. In this case, I used a 52-55mm step-up ring and a 55mm UV filter. By using rings that step up to the same size or diameter, the relatively thin rings will be equal in size at the point where they need to be glued, thereby making the joining process easier. Due to the thinness of the rings, use of a strong glue such as epoxy is desirable so that the joint will not be pulled apart by the weight of the 35mm lens. CAUTION - the weight of a metal-framed 35mm lens is about as much as you would ever want to put onto the plastic threads used on many digicams and extreme caution should be used in attaching and detaching the lens so that the threads are not damaged. Better yet, if you have one of the newer, lighter, plastic-framed lenses, the stress on the threads will be reduced even further. If your digicam lens threads are made of metal the extra weight of a 35mm lens should be of no significance.
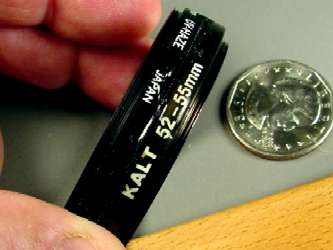
Homemade
Lens Attachment Device
For greater magnification as well as elimination of the possibility that the weight of the 35mm camera lens will damage the digicam lens threads, a flexible bellows can be placed between the camera and the lens (about $60). This is one of the setups used by Danny Young in obtaining his excellent close-up images. This is also where digicams with long zoom lenses really shine. The distance of the lens from the camera means that it may take full optical zoom plus some digital magnification to overcome vignetting as opposed to the approximately 5X zoom needed when the 35mm lens is attached directly to the camera. Digicams without long zooms are not suitable for use with a bellows and reversed 35mm lens.


Ruler,
1/8 Inch, 20X, Reversed Lens
Velcro at 20X with Reversed Lens
A long zoom is desirable when using an attached 35mm lens because at wide angle the image consists of a circle in the middle of the frame. It is necessary to zoom in to about 5X or so to fill the rectangular frame with subject material. Zoom power beyond that is useful in providing an even more magnified view of the subject. Note in the photos above that the magnification obtained with a reversed 35mm lens was about twice that obtained with the camera at 20X zoom and with 7 diopters of close-up lenses attached.

10X
Zoom with Reversed Lens
20X Zoom with Reversed Lens.
The setting for the aperture of the 35mm lens is generally of no consequence since those lenses are designed so that they do not stop down until a photo is snapped (when on a 35mm camera). That is, they are normally fully opened and this is satisfactory when being used as an extreme close-up lens in the manner we are describing. If the lens can be stopped down when off the camera it should be checked to ensure that it is wide open when used for close-up purposes. Focus settings of the 35mm lens seems to have no effect on the image as seen on the LCD or viewfinder.
I also tried using a 28mm wide-angle lens in reverse as a close-up lens. It did increased magnification by about 50% beyond that of the 50mm lens, but only the very center of the image was reasonably sharp, thus it would not be practical to use for most close-up work.


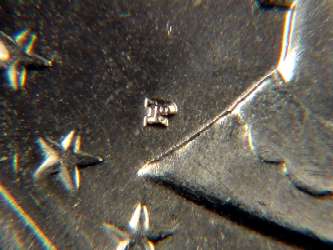
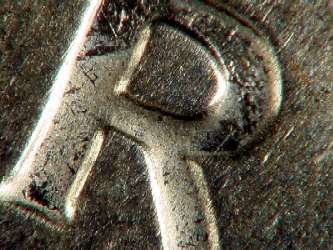
Designer
Initials - 20X & Rev. Lens
Mint Mark - 10X Optical Zoom & Rev. Lens
Comparative Magnification. Which of the above methods (other than loupes) provides the most magnification? Viewing photos of a ruler, approximate image sizes are as follows:
Macro only - 2 inches of the ruler scale
20X zoom - 1.5 inches of the ruler scale
20X plus 7 diopters - 1/4 inch of the ruler scale
Reversed lens - 1/8 inch of the ruler scale
Although these figures are only approximate, it can be seen that the reversed 35mm film camera lens provides about 16 times the magnification of the CD1000 macro mode while still maintaining a good quality image. Of course, if you happen to have an even higher quality lens than the Canon AE-1 lens used here, the image quality might be even better. If you dont have a 35mm camera lens to use, a set of close-up lenses is an economical way to significantly improve magnification of a zoom lens by a factor of about six-eight. Typical cost of a three-lens set is about $40.
Other Methods. Although the above procedures are among the least expensive ways of producing close-up images, there are other, more expensive methods.
1. Microscopes. Various microscopes may be used with digital cameras to obtain highly magnified images. Unless speaking of a childs microscope, the cost of such equipment is usually very high and outside the scope of this article. However, there is one microscope that might be of interest to digicam ownersthe Intel QX3 computer microscope. This item sells for about $100 and has magnifying powers of 10X, 60X, and 200X. It has its own built-in 512 x 384 pixel imaging system and it downloads photos to a PC via USB (do a web search for QX3). Although having a small pixel count, it still makes quite acceptable images if not overly enlarged (How can you go wrong for $100?). What would be even nicer would be a microscope especially designed to accept a wide variety of digicams. Eliminating the built-in imaging device of the QX3 would allow a better lens system without running up the cost too much thereby resulting in a device that many digicam owners might be happy to purchase. The QX3 has been reviewed in several magazines including the April 2000 issue of PC Photo (Pitts:74). For more on microscopes, see Danny Youngs setup and photos at http://www.geocities.com/nzinlay/ and http://www.nzmacro.50megs.com/
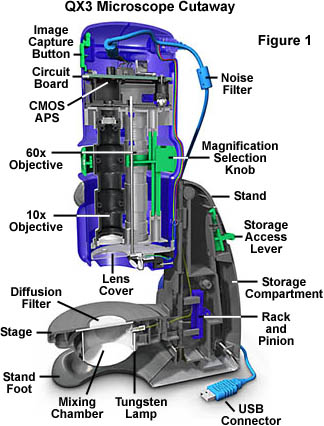
Intel
QX3 Computer Microscope
2. Macro lenses. These lenses are specially designed for close-up work and can be used with cameras that have removable lenses (SLRs). These macro lenses may require that a bellows or tube be placed between the lens and the camera. High quality macro lenses are very expensive.
Lens Cleaning. Adding a number of additional pieces of glass to the lens chain makes it even more desirable to ensure that the surfaces of each piece of glass are as clean as practical. Also, it is desirable to use two step-up rings if possible rather than a step-up ring and an UV filter as I did for attaching the reversed 35mm film camera lens. If the 35mm lens you are using is already threaded for 55mm you are not likely to find a 55-55 ring, in which case you can do as I did and use a UV filter, or use another step-up ring pair such as a 52-58 and 55-58 in order to eliminate the unneeded UV filter glass.
White balance. When using a copy stand and incandescent lights, the color of the subject may be changed accordingly, thus it is advisable to do a manual white balance using a white card.
Lighting. Flash is often helpful or even necessary for macro photography. Larry West notes that adequate light is the most difficult problem to overcome when taking close-up photographs. He states that ring flashes are good for technical scientific work, but provide rather flat lighting which is not good for photographing insects (West:20). Using a bracket to hold a standard flash in the proper position is his recommendation. The Sony HVL-F1000 flash used with the CD1000 has a rather short cord, but can be hand-held in a position which may be better than provided by the flash shoe or the bracket that comes with the flash. When using flash or other types of lighting, the subject is of primary consideration. Smooth, flat objects need to be illuminated evenly and others such as coins need to be illuminated obliquely. One advantage of flash for macro photography is that the flash generally operates at 1/1000 of a second or less. This can help greatly in overcoming blur caused by camera motion at high magnification.
DoF and f/stop. One problem with extreme close-ups is the very limited depth of field (DoF). The DoF may be so slight that the surface of a letter on a coin may be in sharp focus while the surface of the coin itself may be out of focus. Setting the camera for aperture priority and f/11 will help in obtaining maximum DoF. Also, it may be helpful to focus the camera at some point between the closest and farthest point in the subject that you want to be clear in the image. Neither point may then be in absolutely sharp focus, but the DoF may make them appear so to the eye.
Tripod. A tripod is a useful or even necessary item (even if you have a digicam with IS) when doing work in the field. Larry West recommends a good quality tripod without a center post (the post exaggerates movement) and a large ball-type head for faster setup. His favorite tripod is a modified Gitzo 326 (West:28). He uses a mounting ring that clasps the barrel of the lens apparatus rather than the normal bottom camera mount. Such a device might also work well with a CD1000 or other digicam with a long lens snout as it would be steadier than the under-camera mount. Does a tripod affect DoF? Yes and no. You wont normally see tripods addressed in DoF discussions, but when you consider that the most infinitesimal movement can reduce the area of image which appears sharp to the eye, such movement may have the effect is the same as reducing the DoF (Jacobs:18,49).
Self-timer. Even when the camera is attached to a copy stand or sturdy tripod, there will be movement caused by placing hands on the camera for the purpose of pushing the shutter button. This movement is magnified greatly by the use of the close-ups lens, thus it is desirable to use the self-timer feature of the camera. The Image Stabilization (IS) feature of the CD1000 may also be helpful, but for more consistent results always use the self-timer. Just remember, on some digicams the self-timer has to be reset after each and every shot. That is, the self-timer does not remain on until you turn it off, but instead turns off automatically after each photo.
Copy Stand. A good copy stand with lights is almost essential for many types of close-up work. A copy stand holds the camera at a set distance from the subject, a necessity when the DoF is nearly non-existent as is the case with extreme close-up lenses such as a reversed 35mm lens. It also maintains the subject in the center of the field, a very difficult thing to do by hand. Most stands are available with flexible lights which permit you to arrange the direction, type, and intensity of lighting
Moving the subject. Making slight adjustments to the position of highly magnified subjects, especially when the lens is very close to the subject, can be somewhat difficult. One way to get around this in is to place the subject on a piece of cardboard and then adjust the subjects position by adjusting the position of the cardboard.
Camera Alignment. A copy stand will generally maintain the top and bottom of the image frame in good alignment with the copy board, but left/right alignment can easily be disrupted by touching the left or right side of the camera. This in turn will prevent both sides of the image from being in the plane of focus. You will also get a keystone effect. Perfect alignment is difficult to do by eye and the balance of the camera may be such that the camera has a natural tendency to swing out of alignment in the same way a picture frame may tend to tilt when it is not perfectly centered on a nail. One way to help alignment is through the use of a small level placed on the camera LCD. Another method is to use a flat sheet of paper with print. When the camera is adjusted so that print on all four sides of the page is in sharp focus, the camera is properly aligned. If the print at the top and bottom of the page cannot be brought into sharp focus simultaneously, you have a problem. This means that the copy stand is not doing its job and the best solution might be to return it to the vendor, but first be sure that the problem was not caused by the camera being loosely attached to the copy stand.
Focusing. Focusing may be done automatically or manually. The auto focus feature works quite well with a reversed 35mm lens attached as described, but due to the limited DoF may not focus sharply on the area of the subject you are most interested in. Manual focusing allows you to select the plane of focus. One helpful method of focusing is to obtain a basic focus by use of the auto focus system and then make fine adjustments with the camera set for manual focus. Just remember, the camera has to be a certain distance from the subject. If it is too far or too close, the camera will not focus at all.
Results. Digicam owners should not be disappointed if their photographs do not compare with those taken by a professional such as Larry West who has dedicated his life to macro photography. Such pros use fine grain films and the best optical equipment available. Costs can be quite high. Even so, digicam owners have a number of advantages that would make Larry envious:
Big zoom. A big zoom means that many close-up photographs can be taken without resorting to various add-ons, extension tubes, etc.
Image stabilization (IS). Larry prefers to use a tripod whenever he can, and that is the best method. However, there are times when a tripod cannot be used and in those cases an IS system is worth its weight in gold.
Auto or manual white balance. No guessing as to which filter to use. Just rely on the auto white balance, or if being really nit-picky, do a manual balance.
Instant review. Despite the high price of his equipment, Larry has to wait until he gets results from the lab to determine whether he should have taken just one more shot when he had the chance. Digicam owners review their pics in real time.
MPEG. When photographing insects it may sometimes be desirable to get action shots. Larry has to use a motion picture camera (if he has one with him), but many digicams owners just flip a switch.
Ease of use. A film photographer going into the field for a day may have to carry a large amount of film and equipment. Digicam owners can get by with a lot less. The built-in zoom lens replaces two or three others, an IS system means you can do without a tripod, and the instant review feature means that you do not have to bracket or take numerous photos of the same subject to ensure that you have at least one good image. Larry admits that for film cameras being caught with your optics down is the most common foible (West:14).
Image manipulation and correction. At best, a film photographer must scan his or her negatives before making use of a PC. Many still do their work in a chemical lab where opportunities for image correction are very limited as well as very time-consuming.
Investment. When considering switching to a different brand of digicam, most digicam owners will not have to worry about what to do with a large stock of lenses and other equipment which cannot be used with the new camera.
Cost of operation. Larry pays a lot for film and development as well as equipment. Digicam owners can take as many photos as they like without worrying a hang about the cost. A typical Larry West photo setup would read something like this: 200mm macro lens with 4T and 3T close-up lenses, 1.4X multiplier, 27.5mm extension tube, TTL electronic flash with camera compensation dial set at +.7, 25-speed film, 1/8 sec., f/11, on tripod. Its not only clear that Larry has a great deal invested in various pieces of close-up photography equipment, but that he has a lot of camera preparation to take care of before he even thinks of snapping the shutter. Todays modern digicams greatly simplify the photographers tasks when performing those same functions.
Books. Most any photography or digicam book will have a section on macro or close-up photography, but it is seldom lengthy. I did come across a very good but inexpensive book at my local camera store: How to Photograph Insects & Spiders by Larry West and Julie Ridl (Stackpole Books, 1994). It is only $16.95, has 118 pages, and includes almost one hundred superb, full-color close-up photographs. It is written for owners of 35mm SLR film cameras, but most of the techniques are also applicable to digicam photography. Definitely a five-star bookshelf selection. Another excellent book that every macro hobbyist should have is "The Secrets of Close-Up Photography" by Lou Jacobs. There is one good digicam book that does have a large section devoted to close-up photography (24 pages): "Digital Photography Answers! Certified Tech Support by Dave Johnson," (McGraw-Hill, 1999, $24.99).
Other Books. The Amazon.com web site shows the following books on close-up photography:
Complete Guide to Close-Up and Macro Photography, Paul Harcourt Davies.
$23.96.
The Sierra Club Guide to Close-Up Photography in Nature, Tim Fitzharris.
$20.00.
John Shaw's Close-ups in Nature, $18.
The Secrets of Close-Up Photography, Lou Jacobs. $22.39.
How to Photograph close-ups in Nature, Nancy Rotenberg. $17.95.
Macro and Close-Up Photography Handbook, Stan Sholik. $23.96.
Close-Up Photography, William White. $11.96.
Close-Up Photography, Alan R. Constant. $26.36.
How to Photograph Flowers, Heather Angel. $17.95.
The Field Guide to Photographing Flowers, Allen Rokach. $15.25.
Close-Up Photography, Jonathan Hilton. $28.
Principles and Practice of Microscopy and Scientific Photography,
Stanley Klosevych. $36.50
Magazines. Digicam and general photography magazines have articles on macro photography from time to time, but of approximately fifty such magazines I now have on hand, only three mention the subject at all. One gave a short reply concerning macro photography in a Q & A section, and a second had a single column providing several tips for close-up photography. Only one, the June 1999 issue of Photographic, had an actual article of any length (less than two pages if you deduct photos and ads) concerning macro photography: Shooting at Ground Level, by Jim Zukerman (Zukerman:50-54).
Web Sites. Type in Macro Photography in a search engine and many references will appear; most having to do with examples of close-up images. One site which does contain a lot of helpful information is that of Dennis Curtin. Chapter 12.1, Macro Photography, has nine pages of information and sample photographs (Curtin). Its free, just click and print. In fact, the entire Dennis Curtin tutorial is a must have for every digicam owner. If you dont have a printer, you can purchase a copy directly from Dennis web site.
Summary. Is not necessary for you as a digicam owner to purchase a large stock of expensive equipment in order to produce close-up images that will give the film camera pros a run for their money. On the contrary, you as a digicam owner already have a camera with many built-in features that film camera owners have to pay extra for, and sometimes cannot obtain at all. This is especially so if you have a digicam with a long zoom lens, macro mode, white balance, and image stabilization. The zoom and macro mode alone are sufficient to produce outstanding close-up images, and with the addition of an inexpensive set of close-up lenses or the use of a 35mm film camera lens that you may already have on hand, you can produce images that will astound your friends. If you have access to a good loupe, so much the better. The field of macro photography is a broad one and you can be a generalist, or like many others, you can specialize in specific areas such as industrial or mechanical items, insects, zoo animals, backyard wildlife, glassware, miniature art, crystals, minerals, stone surfaces, toadstools, birds, flowers, coins, plant structures, electronic components, or objects around the home to name just a few. So what are you waiting for?
REFERENCES
Baer,
Marcel. Alpine Garden. Internet. Forum post. Rec.photo.digital,
12/14/2000.
http://mypage.bluewin.ch/edlibaer/anblick/alpinegarden/
E-mail
marcel.baer@bluewin.ch
Bruce, Helen F. Your guide to Photography. Barnes & Noble, Inc., 1969.
Curtin, Dennis. Internet. http://www.photocourse.com/
Hilliard, Mark. Secret World. Internet. Digital Outback Photo. E-mail CVFrayedKnot@cs.com. http://www.orneveien.org/n2hhr/
Jacobs, Lou Jr. The Secrets of Close-up Photography. Cincinnati, Writers Digest Books, 1997.
Johnson, Dave. Digital Photography Answers! Certified Tech Support. Berkley, CA, McGraw-Hill, 1999.
Kodak.
A Glossary of Photographic Terms. Internet. 2000.
http://www.kodak.com/global/en/consumer/glossary/glossaryContentsText.shtml
Kumery,
Jerry. CD1000 Macros. Internet. 2000. http://members3.clubphoto.com/jerry248191/
E-mail
jjkumery@aol.com.
Pitts, Wes G. Digital Camera Test Drive, PC Photo: 74 (April 2000).
Pollet,
Wim. Loupe Macros. Internet. Belgium Digital.
2000.
E-mail
wim.pollet@pandora.be. www.belgiumdigital.com
Tasci,
Murat. Ultra CLOSE-UP with, F700,F770 (5X Zoom needed)
Forum
post, Digital Photography Review. 15/4/2000.
http://www.dpreview.com/forums/read.asp?forum=1009&message=197826
E-mail
murattasci@hotmail.com.
Walkenbach,
John. Internet. 2000. http://www.j-walk.com/digitalimages/
E-mail
john@j-walk.com
West, Larry and Julie Ridl. Insects & Spiders. Mechanicsburg, PA, Stackpole Books, 1994.
Young,
Danny. Macros and Microscope Photography with the CD1000.
Internet.
http://www.geocities.com/nzinlay/
and http://www.geocities.com/nzmacro/
E-mail
inlay@xtra.co.nz. 2000.
Zukerman,
Jim. Shooting at Ground Level, Photographic: 50-54 (June 1999).